How to Download and Install Marvel Rivals Mods – 5 best mods for Marvel Rivals
Key Takeaways
- Modding Marvel Rivals can enhance your gameplay with new skins, smoother performance, and custom features all available only for PC players.
- While mods are currently not bannable, always check Marvel Rivals’ official Discord for potential policy updates.
- Proper installation involves downloading tools like WinRAR, finding mods on Nexus Mods, and carefully navigating your game directory to create a “mods” folder.
Why Mods Are a Game-Changer for Marvel Rivals
Let’s face it gaming gets a whole lot better when you can tweak your favourite characters, fix annoying issues like FPS drops, or add a nostalgic twist to your experience. Mods for Marvel Rivals bring endless possibilities for creativity, making the game more exciting than ever.
However, modding isn’t for everyone, and it’s currently limited to PC players. Console players, unfortunately, won’t be able to participate in this enhanced experience. But for PC gamers, this guide will walk you through everything you need to know about downloading, installing, and enjoying mods safely and efficiently.
Ready to dive into modding? Let’s break it down step-by-step.

How to Install Mods for Marvel Rivals
Step 1: Get WinRAR
Before you can install mods, you’ll need WinRAR, a free file extraction program that helps you open ZIP files.
- Go to the WinRAR website and download the free version.
- Save the file to your Downloads folder and follow the installation instructions.
- Once installed, you’re ready to start extracting mod files.
Step 2: Browse Nexus Mods
The best place to find mods for Marvel Rivals is Nexus Mods, a trusted site with a wide variety of game modifications.
- Visit NexusMods.com.
- Use the search bar to look for “Marvel Rivals” and make sure to select “Games” in the dropdown menu.
- Browse the mods listed, such as character skins, performance enhancers, and more.
- Choose a mod that excites you and click on it to open the mod page.
Step 3: Download the Mod
Once you’ve selected a mod:
- Go to the Files tab on the mod page.
- Click on Manual Download (slow download for free accounts).
- Save the downloaded file in your Downloads folder.
Step 4: Open and Extract the Mod
Mods are typically downloaded in ZIP format. Here’s how to extract them:
- Right-click the ZIP file.
- Choose Open With > WinRAR.
- If WinRAR isn’t listed, click “Choose another app” and select it manually.
- Check the box to always use WinRAR for ZIP files.
Once extracted, you’ll see a .pack file, which is the actual mod file you’ll be using.
Step 5: Locate Your Game Files
The next step is to find the game files for Marvel Rivals. Depending on where you downloaded the game, the process is slightly different.
For Epic Games:
- Open your Epic Games library.
- Click the three dots next to Marvel Rivals and select Manage.
- Click the folder icon under Installation to open the game directory.
For Steam:
- Right-click on Marvel Rivals in your Steam library.
- Select Manage > Browse Local Files.
- This will take you directly to the game directory.
Step 6: Create a Mods Folder
Inside the game directory, navigate to the following folders:
Marvel > Content > Packs
- Right-click in the blank space within the Packs folder.
- Select New > Folder.
- Name this folder exactly as specified in the mod instructions (copy-pasting the name from the mod page is recommended to avoid typos).
Step 7: Install the Mod
- Open the extracted mod file.
- Drag the .pack file from the mod folder into the Mods folder you just created.
- Repeat this process if you want to install multiple mods.
Pro Tip: If you’re installing multiple mods for the same character (e.g., Spider-Man skins), ensure you remove old mods to avoid conflicts. Mods that modify the same file type can’t be used simultaneously.
Step 8: Launch the Game
Once you’ve installed your mods:
- Launch Marvel Rivals.
- Select the character, and the mudded skin or feature should be applied.
If everything was done correctly, your mod will work seamlessly.
5 Best Mods for Marvel Rivals
Looking for inspiration? Here are five mods to try:
1. FPS Boost

Lag ruining your gameplay? The FPS Boost mod adjusts in-game settings to maximize performance, giving you a smoother experience even on lower-end PCs.
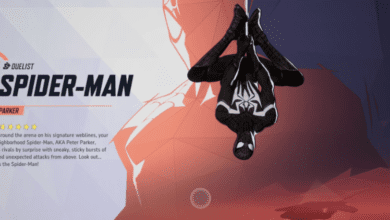
2. Symbiote Spider-Man

This fan-favourite mod adds the iconic black Symbiote suit for Spider-Man, giving him a darker and edgier look. Perfect for anyone who loves the classic Venom storyline.
3. Carnage Venom

Turn Venom into his terrifying red counterpart with the Carnage Venom mod. It’s sleek, brutal, and sure to make your enemies think twice before challenging you.
4. CJ as Winter Soldier

This nostalgic mod swaps out the Winter Soldier’s skin for Carl “CJ” Johnson from Grand Theft Auto: San Andreas. It’s a hilarious way to bring GTA’s iconic protagonist into the Marvel universe.
5. Akatsuki-Themed Cloak & Dagger

This Naruto-inspired mod gives Cloak a sinister Akatsuki robe, while Dagger’s outfit gets a sleek black recolour. A must-try for anime fans!
FAQs
1. Are mods bannable in Marvel Rivals?
Currently, mods are not bannable, but the developers advise caution when modifying game files. Check the official Discord channel regularly for updates on modding policies.
2. Can console players use mods?
No, mods are only available for PC players. Console users cannot modify game files.
3. What happens if I install multiple mods for the same character?
Mods that alter the same file type cannot coexist. For example, if you have two Spider-Man skins, you’ll need to remove one before installing the other.
4. Do mods affect gameplay performance?
Most mods, especially cosmetic ones, do not impact performance. However, mods like FPS Boost can improve gameplay by optimizing settings for smoother performance.
5. How do I fix a broken mod?
If a mod isn’t working, double-check that:
- The Mods folder name matches the one in the instructions.
- You’re using the correct file path.
- There are no conflicting mods.


